We follow ecommerce best practices, including secure encrypted links for our checkout and account pages. Your credit card info is handled securely and never stored on our server. We are located in Canada, so our default store currency is Canadian dollars. We have a currency switcher that allows you to view prices in USD as well as purchase in USD. It’s up to you which you use. When you buy in Canadian dollars, your credit card company or Paypal will do the conversion to your local currency as required. We only use the personal information you provide to us, for example home address, email address, phone number and order details, to communicate with you and to maintain the necessary data retention required of us by tax authorities etc. Our website securely connects to the web APIs of other service providers (eg payment gateway providers Square, Stripe and PayPal, and shipping companies, Canada Post, DHL and Shipstation) to pass along the required information needed to complete and ship your orders. These providers are very serious about keeping these transactions private. We accept credit card payments via our payment gateway, square.com. Alternatively, you can pay using PayPal. Your card details go to Square or PayPal and are never stored on any servers we control. On our product pages, if we don’t have stock on an item, you will see that it is “available on backorder.” Usually this just means that we don’t have that item built up and ready to ship immediately. In such cases we can usually make the item up in a day or two. Occasionally we are waiting on materials to make a regularly stocked item and that may translate into a longer delay. We generally will post a notice on the product page warning about such situations, but if you have made your order and we expect even a few days delay before shipping, we will advise you promptly, giving you the option to modify or cancel your order as you see fit. When a credit card is used for online purchases, some security checks take place to protect both the seller and the card owner. Payment errors usually result in some sort of helpful message on the checkout page telling you what’s wrong. But they can be confusing. Obviously, the card number, expiry date and the CVV code on the back of the card must all correlate for any payment to succeed. However, a lot of people are not aware that a postal code and sometimes a street address check are made. When the payment processor looks up the details associated with your credit card, it will compare address data it has on file with what you entered in the billing address (not shipping address!) on our North Arm checkout page. If the postal code of the two do not match, the payment will fail. The idea is that if someone tried to use your stolen or lost card for an online purchase, they are not likely to succeed because they’d have to know your address and postal code. Occasionally when people enter orders on our system they fill in the billing address field with where they want the package to go. Instead you should always fill in the billing address to match the credit card you are using and then fill in the shipping address with where the item should be sent. In general, we do not offer volume discounts on the base price of the knife. On a case by case basis, we can offer discounts on certain options like engraving. Please contact us with your request and we will let you know what we can accommodate. Once you have contacted us and we agree on a discount, you would then place an order on our web store and add an order note to the checkout page order notes field to remind us of the discount offer. We will credit your order by the agreed percentage from the pre-tax item costs and send you an updated invoice. Please contact us with specifics and we will quote you a price. No. We make and sell a set line-up of products, each of which is available in several variations, but we do not do custom designs or alteration of our designs. This is primarily because we make knives on CNC equipment that requires extensive fixturing design ahead of time and is thus not cost effective to the end customer for one-off production. This is likely the most asked question we get about our “CNC finish,” undoubtedly because very few knives look this way. Those lines are made by our computer controlled milling machine. On most knives, the main bevel of the knife is formed by grinding or sanding with an abrasive stone or belt. In contrast, we actually cut the bevel out in tiny steps with our mill. Depending on the model, each successive contour line is between 1 and 2 thousandths of an inch lower than the step above it. Many people wonder if theses small steps help release food. We have had enough customer feedback to say that on the bigger board knives you may notice slightly better food release than typical, especially with hard, wet items like potatoes. Based on our own every day use, most food items cut the same regardless of the finish. Perhaps this should be expected given the shallowness of each step and the likelihood that soft, wet foods could simply conform to these shallows. Many of our customers seem curious about our handle attachment system, probably because they can see that the handles have screw heads instead of rivet heads, but they don’t quite get how the attachment works. Our handles are typically attached at two or three points to the blade tang. Each of these points uses three parts: a flat head screw on each side and a round “standoff” inside that accepts the screws at each end. The standoff fits accurately to a matching hole in the tang and protrudes enough from the surface on each side to align the handle scales. The screws tighten from each side, threading into the standoff. We attach our handles with screws so that they can be easily replaced or upgraded, as might be the case if a handle is damaged or the customer wants to switch to a different handle colour or material. Contact us if this is something you need and we’ll let you know what’s available. Most customers, however, should treat our knives as if they had riveted-on handles; there should normally be no need to remove handles and we don’t advise it because the parts are easy to lose. That is almost always the first question people ask, especially if they are aware of our prices, which, though not cheap, are very competitive with higher-end mass produced knives from well known companies in Germany and Japan. Our knives are set apart from the competition by the high quality materials we use, unique minimalistic esthetic and our small scale production in BC Canada. The heart of any knife is the steel it is made from. The steel used in almost all German factory knives has been around for over 3 decades. The steel we use today, CPM MagnaCut, was designed by metallurgist Larrin Thonas and introduced by Crucible Industries in 2021. Magnacut was designed specifically for cutlery. It is perhaps the best balanced steel out there: great edge holding, strength and corrosion resistance. Its modern chemical composition and manufacturing process give it significantly better edge retention than the older softer steels used by many knife manufacturers. Great steel means keen edges that last a long time. Sharp edges are not only safer to use but add immensely to the enjoyment of meal preparation or any cutting task. Our standard handle material, G10, is another top quality component, used extensively by custom makers and the manufactures of high end production knives. It is an epoxy fiberglass laminate which means it is extremely tough. It won’t crack, crumble or absorb liquids. If you ever did manage to wreck the handle on your knife, we thought of that too. They are attached with stainless steel screws instead of rivets (what most knives use) which makes them easily removable/replaceable. For British Columbia residents or tourists to BC, having our “BC Maple Leaf” engraved on their knife makes for a good story, and certainly makes a great gift. For other Canadians, we’re still sort of local, and for other North Americans we’re still not that far away. For the rest of you, though the distance from us to you may be greater, a North Arm knife still represents an ecological choice because in all likelihood it will be the last one you ever buy. We originally made all our knives by machining the blade bevel, rather than grinding it (grinding is how most knives are made). This original finish, in which we polish the milled bevel but leave the machining lines is what we called our CNC finish. We have now transitioned all models to ground bevels. We no longer offer any knives with this finish. Sheath knife handedness refers to the user’s dominant hand in relation to a sheath knife. At the moment we offer just one of our sheath knives (the Lynx) in which the sheath is molded differently for righties and lefties. If you choose a right sheath, what you get is a sheath that would be worn on the right hip and be handled with the right hand. The spine of the blade faces forward so when you grab it, it’s in its natural position in your hand. Likewise, a left sheath is worn on the left side and drawn with the left hand. The knife’s spin faces forward, same as for the right. Time to get your order depends on 3 main factors: Yes we can do custom engraving, with some limitations: We accept credit card payments via our payment gateway, square.com. Alternatively, you can pay using PayPal. Your card details go to Square or PayPal and are never stored on any servers we control. On our product pages, if we don’t have stock on an item, you will see that it is “available on backorder.” Usually this just means that we don’t have that item built up and ready to ship immediately. In such cases we can usually make the item up in a day or two. Occasionally we are waiting on materials to make a regularly stocked item and that may translate into a longer delay. We generally will post a notice on the product page warning about such situations, but if you have made your order and we expect even a few days delay before shipping, we will advise you promptly, giving you the option to modify or cancel your order as you see fit. We ship exclusively using tracked services, mostly via Canada Post . So there will always be a tracking number for you to use to see where your order is. When we create your shipping label you will receive an email with the tracking number. Occasionally, some system along the way will lose a shipping email. If you get an order complete email from us, that generally means we have created the label and are about to ship, which means you should have also received a tracking number email. If you did not receive a tracking number, just let us know and we will make sure you get one. For USA customers, when a Canada Post package crosses the border into the US, USPS takes over tracking, so you can enter the same tracking number into the USPS tracking system to get details of its progress towards you. When a credit card is used for online purchases, some security checks take place to protect both the seller and the card owner. Payment errors usually result in some sort of helpful message on the checkout page telling you what’s wrong. But they can be confusing. Obviously, the card number, expiry date and the CVV code on the back of the card must all correlate for any payment to succeed. However, a lot of people are not aware that a postal code and sometimes a street address check are made. When the payment processor looks up the details associated with your credit card, it will compare address data it has on file with what you entered in the billing address (not shipping address!) on our North Arm checkout page. If the postal code of the two do not match, the payment will fail. The idea is that if someone tried to use your stolen or lost card for an online purchase, they are not likely to succeed because they’d have to know your address and postal code. Occasionally when people enter orders on our system they fill in the billing address field with where they want the package to go. Instead you should always fill in the billing address to match the credit card you are using and then fill in the shipping address with where the item should be sent. To switch the clip between sides: We do not ship the Skaha with loctite on the two pivot screws (or any of the screws). In general, this is because the Skaha pivot area is subject to initial bearing to blade wear-in, which may call for some adjustments during this period. In addition, knives that are fidgeted with a lot, used hard or otherwise accumulate wear over time are eventually going to need the pivot adjusted to maintain the ideal preload on the bearings. Those adjustments are harder to do if the threads have thread-lock on them. The Skaha was designed to be maintainable which also means that it needs to be maintained. Usually, this amounts to a quick periodic inspection for side to side blade play. And if the knife feels gritty or looks like it may have pocket lint on the internals a soapy water bath, drying and oiling will do it good. Our guiding philosophy is to only use thread locker if the situation demands it. You may have a particular knife that tends to loosen, perhaps because of vibration, grit binding between the scale and the pivot screw head, being subject to wide temperature swings, or any number of other hard to foresee circumstances. If this is your case, then a medium thread-locker is probably your answer. If you rarely find side to side blade play when you do you check, just re-tighten as needed and don’t bother with the loctite. If frequent pivot loosening is happening, we suggest you apply a tiny bit of medium strength loctite blue paste to each pivot screw thread, tighten the pivot screws evenly (T10 Torx) just to the point that side to side play goes away and maybe 1/32 or 1/16th of a turn more. Check the action. If action is sluggish, back off one of the screws till there’s barely noticeable play again and readjust slightly less tight. Too tight leads to unnecessary wear and sluggish action. You want the blade to swing freely but not have play. Let the loctite cure overnight. When checking pivot screws and blade play, take an extra minute to check the 4 standoff screws (T8) and clip mount screw(s) (T10) for tightness. They are much less likely to come loose, but if you find yourself tightening them fairly often, then they should also have some thread-locker. The loctite we suggest is part number 37643. These instructions guide you through how to remove and replace handles on our fixed blade knives. Most people will never have to or want to remove their handles, but you might if you are extremely curious or you want to change handle scales for some reason. The scales on older models are attached with 4-40 screws with hex socket heads. You will need two 1/16 inch allen keys to loosen and tighten the screws. Our Lynx and newer models use 6-32 screws with T15 or T10 (Torx drive) heads; usually a single driver is all you need. You will also need a thin yet strong knife or putty knife to aid in separating scales from the tang. Prepare a clean work space, like a table or bench top, so that if you drop any of the small parts, they don’t get away. Lots of light helps too. It is a good idea to tape the edge of the blade so that you don’t cut yourself. A cutting board can be used as the actual work surface to avoid possibly marring a nice table top. Inspect your work. Make sure there are no significant gaps between handle and scales that would indicate something got trapped underneath. On wood handles, we recommend applying some paste wax at the joint between scale and tang along the perimeter of both scales to seal water out as much as possible. So, in case you need to take things apart, here are the component and driver sizes by model: If you need any small hardware or have further questions about it, please contact us. Keeping your Skaha folder running smoothly and cutting superbly is not difficult. Like any other knife, your Skaha works best when you keep it sharp. And because it has moving parts, cleaning, adjustment and lubrication is something you can expect to do occasionally. The steel we use holds an edge exceptionally well, but does need maintenance to stay sharp. Many systems will work. We cover a variety of sharpening tools on our sharpening page. Avoid pull through sharpeners that use tungsten carbide blades to peel away metal; they remove too much steel and don’t produce a good finish. It’s important to be aware that several components in the Skaha are made with martensitic stainless steel (heat treatable types of stainless) Such steels are highly stain resistant, not stain proof. They can corrode in very extreme environments, such as prolonged exposure to salt water or strong acids. As soon as possible after exposure to corrosive environments, wash the knife as described in the next paragraph. An important part of folding knife maintenance is keeping the moving components clean and lubricated to insure smooth operation. If your Skaha feels gritty or stiff it probably needs a thorough washing and some lubricant. Wash it in warm soapy water. Work the blade back and forth under the water to help get all the dirt out. If possible spray into the pivot area with strong pressure (eg. kitchen sink faucet with spray mode) and move the blade through its travel. Do this until the gritty feeling is gone. Then rinse any remaining soap away and allow to air dry. You may blow the knife out with compressed air to speed drying. Once dry, lubricate the pivot, bearings, and detent ball with a few small drops of light oil. A fine tip oiler like the one we sell on our website is very useful for reaching into this area while the knife is assembled. Washing for long enough will remove almost any dirt but if this procedure doesn’t cure the grittiness of your knife, you may partially disassemble it to clean and lubricate See below. For maximum smoothness and to minimize wear on the bearings, the pivot screws must be correctly adjusted. We adjust the pivot before shipping and it should remain properly adjusted for quite awhile. However, eventually wear and other factors cause the pivot screws to require adjustment. The pivot screws should be just tight enough to eliminate lateral (side to side) “blade play”. Any tighter can cause the action to become stiff and will cause unnecessary wear on the bearings. To check for play, gently push and pull sideways on the blade when locked open. You shouldn’t see or feel any obvious slack. If slack is present, tighten either pivot screw very slightly. Repeat until play is gone. If the blade’s travel feels stiff and no lateral play is present, your pivot may be too tight. In that case, loosen until you get play then tighten as described. To take the Skaha apart for cleaning, follow the steps below. We have also made a video showing the process. [kad_youtube url=”https://youtu.be/a3xHl8Psfzg” ] Note: The Skaha pocket clip screw(s) serve the dual role of securing the clip and anchoring the lockbar to the handle scale. We recommend you leave the pocket clip installed during service. If you must remove the pocket clip, don’t remove the lockbar from the scale. There is no reason to do so and any damage caused would not be covered by warranty. Improper removal can cause the lockbar to snap and re-installing it improperly can cause your knife to function incorrectly. If you have a valid reason for removing the LB, contact us for directions on how to do so. Also, repeatedly removing and reinstalling the lockbar could eventually cause slack in the press fit. If you decide to use the knife without a clip, the screw(s) must be reinstalled to make sure the lockbar stays secured in the handle scale. The screw(s) are just short enough that they won’t interfere with the blade but it is a good idea to check the clearance after assembly. No. We make and sell a set line-up of products, each of which is available in several variations, but we do not do custom designs or alteration of our designs. This is primarily because we make knives on CNC equipment that requires extensive fixturing design ahead of time and is thus not cost effective to the end customer for one-off production. Yes we can do custom engraving, with some limitations: We are not a custom knife maker; we concentrate solely on producing our own lineup. If you have a dream project for a custom knife you’d like see come to life, we are not the ones to do it. We suggest you do an online search for custom knifemakers within your region or as far out as you have to look to find someone with the capabilities and desire to do your project, and then start a dialogue. You’ll find out soon enough if you think you can work with that maker. Alternatively, if you have the tools and the basic skills, you could consider making your own knife. You can find plenty of information online to guide you. Time to get your order depends on 3 main factors: We can ship to most places but it can get expensive outside of North America. See Costs below. Shipments to Australia and many western European countries that support tracked parcel shipments via national postal systems are fairly straightforward and not outrageously expensive. But even some European destinations are not served by tracked postal systems. In those cases Canada Post uses Fedex and a priority service to do deliveries and tracking and it starts to get outrageous. At that point you have to get creative, as in: do you have a friend in North America who is travelling your way soon? Customers outside of the USA and Canada should verify before they place an order that the type of knife they are purchasing can be imported to the country where they live. In general, the kitchen and fixed blade knives we sell should not be a problem, but some countries may have rules about maximum blade lengths, or other restrictions, so if you are in doubt, please check the applicable laws in your jurisdiction. We ship from metro Vancouver British Columbia. Generally the farther away you are the more it costs. We ship primarily via Canada Post. Our checkout page does a look-up at Canada Post for exact shipping charges to your address, so you will see immediately the total cost to ship. Already in the cart, you can check shipping costs for items in the cart by supplying a country and postal code. If the Canada Post website isn’t reachable when you place your order, you will still see a flat rate shipping option for USA and Canada destinations. In such cases we will only charge you what it costs us to ship (usually less than this) and refund the difference to your credit card if it is more than $1. Within metro Vancouver shipping is usually about $11; other BC locations about $12-15 and other parts of Canada and the USA it’s normally $15-23. To much of western Europe and Australia, shipping costs in the $25-60 CAD range for a single knife and maybe $100 for 5 knives, so it gets less per knife in numbers. For countries not served by tracked postal services, costs can range up to $170 or more for a single knife, so not practical, unfortunately. If you have other questions please email us. We only offer trackable type shipping methods. This means that you will get an email with your tracking number and be able to follow its progress to your address. We ship exclusively using tracked services, mostly via Canada Post . So there will always be a tracking number for you to use to see where your order is. When we create your shipping label you will receive an email with the tracking number. Occasionally, some system along the way will lose a shipping email. If you get an order complete email from us, that generally means we have created the label and are about to ship, which means you should have also received a tracking number email. If you did not receive a tracking number, just let us know and we will make sure you get one. For USA customers, when a Canada Post package crosses the border into the US, USPS takes over tracking, so you can enter the same tracking number into the USPS tracking system to get details of its progress towards you. We want you to be a happy North Arm customer. We offer a 30 day satisfaction guarantee, meaning that if the product does not meet your expectations during that time, for any reason, just ship it back to us (you are responsible for shipping/insurance costs) in it’s original condition and we will refund the original purchase price minus the original shipping charges. Our satisfaction guarantee excludes: We stand behind the quality of our products by offering a lifetime warranty against defects in materials or workmanship. This warranty applies to the original purchaser. If you bought one of our products in the secondary market, restrictions to the warranty will apply. Our warranty excludes: If you run into troubles, please contact us. Once we understand the circumstances of your issue we will decide how to best rectify the problem. We finish the wood handle scales with a highly water resistant coating which will help to preserve the wood’s natural beauty for years to come. To maximize the life of the finish, follow these care instructions.
Ecommerce
Knife Design
Polished Stonewash
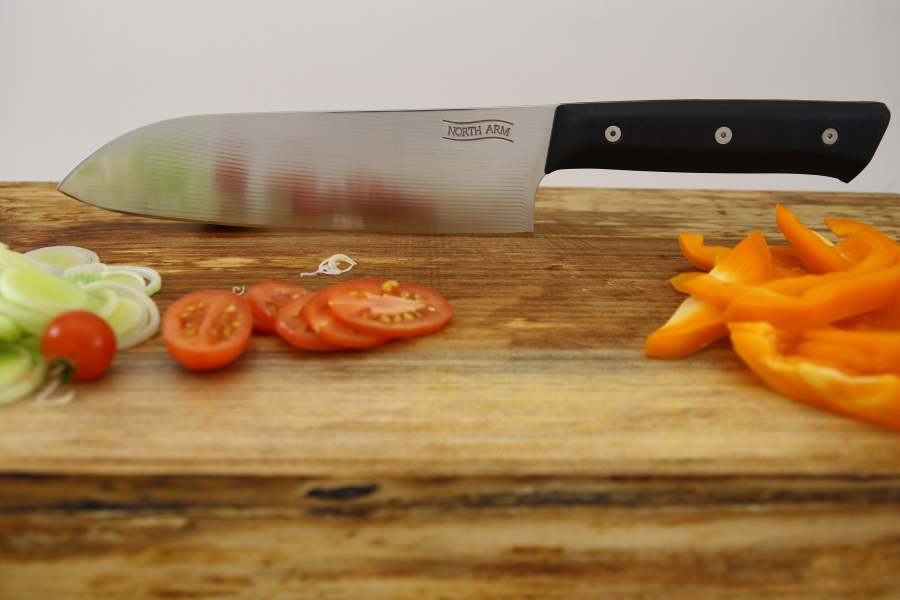
 This finish is now the standard finish for all models. The blade bevel is ground, and then tumbled in ceramic media to remove grinding scratches and further tumbled in a burnishing media to create a smoother and more reflective finish.
CNC Finish
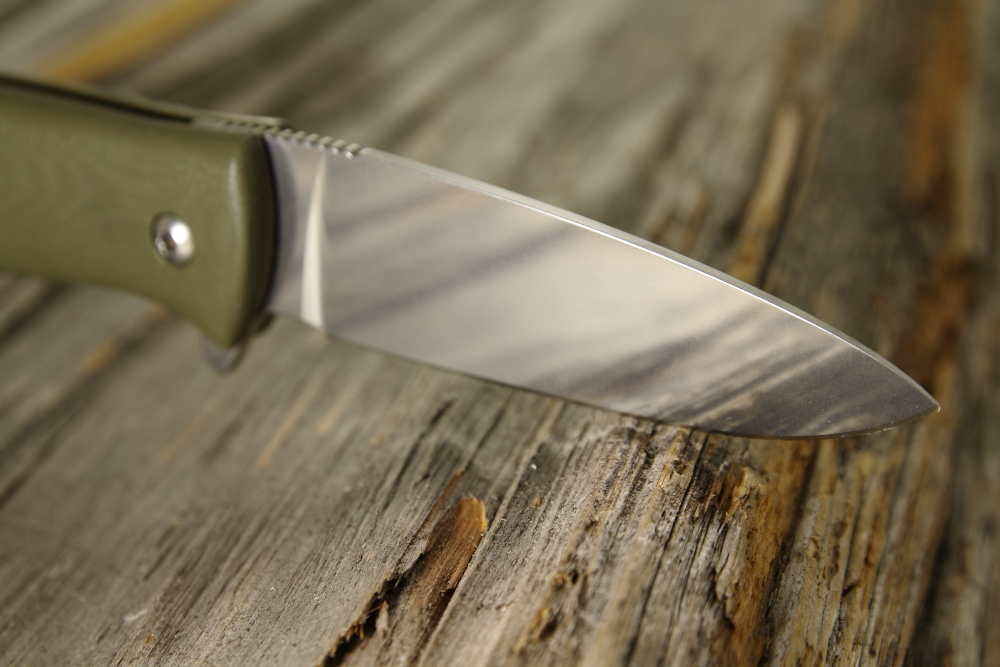
 This was our original finish. The knife bevel is milled as a series of shallow steps (from 0.001 to 0.003 inches each depending on the model). We then polish the bevel with various grits before and after heat treat, ending up with a bright reflective sheen. The CNC lines remain visible, adding a unique texture to the blade.
Orders

Knife Maintenance
 With the left side option on the Skaha, there’s a screw on both sides. The one on the right side normally holds both the clip and the lockbar. The clip mount point on the other side has a backing nut that the clip screw threads into. The lockbar side screw must always be installed during operation, whether it is holding a clip or not and whether it is a regular Skaha or one with dual clip mounts (for left side carry)

Before you start
Removing the old handle scales
Preparation before installing new handle scales
Attaching the scales
Finishing up
There may be times when you need to or want to disassemble your knife and you’d like to know the screw sizes involved. For our Skaha folder, because of its moving parts and internal bearings, disassembly for service is more likely than for our fixed blade models. We do have an article on typical fixed blade handle removal and replacement.
Sharpening
Routine Cleaning
Skaha screw and driver sizes
Adjusting pivot tightness
Disassembly and Reassembly
Services
Shipping
Destinations
Costs
Order Tracking
Warranty
Satisfaction Guarantee
Lifetime Warranty
Knife Care
Ecommerce
We follow ecommerce best practices, including secure encrypted links for our checkout and account pages. Your credit card info is handled securely and never stored on our server.
We are located in Canada, so our default store currency is Canadian dollars. We have a currency switcher that allows you to view prices in USD as well as purchase in USD. It’s up to you which you use. When you buy in Canadian dollars, your credit card company or Paypal will do the conversion to your local currency as required.
We only use the personal information you provide to us, for example home address, email address, phone number and order details, to communicate with you and to maintain the necessary data retention required of us by tax authorities etc.
Our website securely connects to the web APIs of other service providers (eg payment gateway providers Square, Stripe and PayPal, and shipping companies, Canada Post, DHL and Shipstation) to pass along the required information needed to complete and ship your orders. These providers are very serious about keeping these transactions private.
We accept credit card payments via our payment gateway, square.com. Alternatively, you can pay using PayPal. Your card details go to Square or PayPal and are never stored on any servers we control.
On our product pages, if we don’t have stock on an item, you will see that it is “available on backorder.” Usually this just means that we don’t have that item built up and ready to ship immediately. In such cases we can usually make the item up in a day or two.
Occasionally we are waiting on materials to make a regularly stocked item and that may translate into a longer delay. We generally will post a notice on the product page warning about such situations, but if you have made your order and we expect even a few days delay before shipping, we will advise you promptly, giving you the option to modify or cancel your order as you see fit.
When a credit card is used for online purchases, some security checks take place to protect both the seller and the card owner. Payment errors usually result in some sort of helpful message on the checkout page telling you what’s wrong. But they can be confusing.
Obviously, the card number, expiry date and the CVV code on the back of the card must all correlate for any payment to succeed. However, a lot of people are not aware that a postal code and sometimes a street address check are made.
When the payment processor looks up the details associated with your credit card, it will compare address data it has on file with what you entered in the billing address (not shipping address!) on our North Arm checkout page. If the postal code of the two do not match, the payment will fail. The idea is that if someone tried to use your stolen or lost card for an online purchase, they are not likely to succeed because they’d have to know your address and postal code. Occasionally when people enter orders on our system they fill in the billing address field with where they want the package to go. Instead you should always fill in the billing address to match the credit card you are using and then fill in the shipping address with where the item should be sent.
In general, we do not offer volume discounts on the base price of the knife. On a case by case basis, we can offer discounts on certain options like engraving. Please contact us with your request and we will let you know what we can accommodate.
Once you have contacted us and we agree on a discount, you would then place an order on our web store and add an order note to the checkout page order notes field to remind us of the discount offer. We will credit your order by the agreed percentage from the pre-tax item costs and send you an updated invoice.
Please contact us with specifics and we will quote you a price.
Knife Design
No.
We make and sell a set line-up of products, each of which is available in several variations, but we do not do custom designs or alteration of our designs. This is primarily because we make knives on CNC equipment that requires extensive fixturing design ahead of time and is thus not cost effective to the end customer for one-off production.
This is likely the most asked question we get about our “CNC finish,” undoubtedly because very few knives look this way. Those lines are made by our computer controlled milling machine. On most knives, the main bevel of the knife is formed by grinding or sanding with an abrasive stone or belt. In contrast, we actually cut the bevel out in tiny steps with our mill. Depending on the model, each successive contour line is between 1 and 2 thousandths of an inch lower than the step above it.
Many people wonder if theses small steps help release food. We have had enough customer feedback to say that on the bigger board knives you may notice slightly better food release than typical, especially with hard, wet items like potatoes. Based on our own every day use, most food items cut the same regardless of the finish. Perhaps this should be expected given the shallowness of each step and the likelihood that soft, wet foods could simply conform to these shallows.
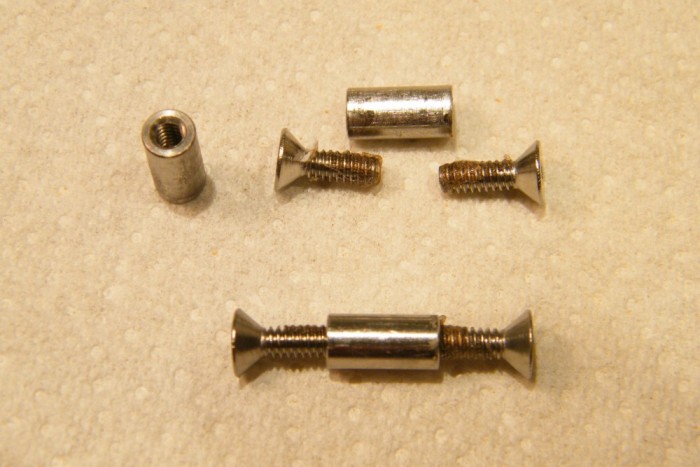
Many of our customers seem curious about our handle attachment system, probably because they can see that the handles have screw heads instead of rivet heads, but they don’t quite get how the attachment works.
Our handles are typically attached at two or three points to the blade tang. Each of these points uses three parts: a flat head screw on each side and a round “standoff” inside that accepts the screws at each end. The standoff fits accurately to a matching hole in the tang and protrudes enough from the surface on each side to align the handle scales. The screws tighten from each side, threading into the standoff.
We attach our handles with screws so that they can be easily replaced or upgraded, as might be the case if a handle is damaged or the customer wants to switch to a different handle colour or material. Contact us if this is something you need and we’ll let you know what’s available. Most customers, however, should treat our knives as if they had riveted-on handles; there should normally be no need to remove handles and we don’t advise it because the parts are easy to lose.
That is almost always the first question people ask, especially if they are aware of our prices, which, though not cheap, are very competitive with higher-end mass produced knives from well known companies in Germany and Japan.
Our knives are set apart from the competition by the high quality materials we use, unique minimalistic esthetic and our small scale production in BC Canada.
The heart of any knife is the steel it is made from. The steel used in almost all German factory knives has been around for over 3 decades. The steel we use today, CPM MagnaCut, was designed by metallurgist Larrin Thonas and introduced by Crucible Industries in 2021. Magnacut was designed specifically for cutlery. It is perhaps the best balanced steel out there: great edge holding, strength and corrosion resistance. Its modern chemical composition and manufacturing process give it significantly better edge retention than the older softer steels used by many knife manufacturers. Great steel means keen edges that last a long time. Sharp edges are not only safer to use but add immensely to the enjoyment of meal preparation or any cutting task.
Our standard handle material, G10, is another top quality component, used extensively by custom makers and the manufactures of high end production knives. It is an epoxy fiberglass laminate which means it is extremely tough. It won’t crack, crumble or absorb liquids. If you ever did manage to wreck the handle on your knife, we thought of that too. They are attached with stainless steel screws instead of rivets (what most knives use) which makes them easily removable/replaceable.
For British Columbia residents or tourists to BC, having our “BC Maple Leaf” engraved on their knife makes for a good story, and certainly makes a great gift. For other Canadians, we’re still sort of local, and for other North Americans we’re still not that far away. For the rest of you, though the distance from us to you may be greater, a North Arm knife still represents an ecological choice because in all likelihood it will be the last one you ever buy.
We originally made all our knives by machining the blade bevel, rather than grinding it (grinding is how most knives are made). This original finish, in which we polish the milled bevel but leave the machining lines is what we called our CNC finish. We have now transitioned all models to ground bevels.
Polished Stonewash
This finish is now the standard finish for all models. The blade bevel is ground, and then tumbled in ceramic media to remove grinding scratches and further tumbled in a burnishing media to create a smoother and more reflective finish.
CNC Finish
This was our original finish. The knife bevel is milled as a series of shallow steps (from 0.001 to 0.003 inches each depending on the model). We then polish the bevel with various grits before and after heat treat, ending up with a bright reflective sheen. The CNC lines remain visible, adding a unique texture to the blade.
We no longer offer any knives with this finish.
Sheath knife handedness refers to the user’s dominant hand in relation to a sheath knife. At the moment we offer just one of our sheath knives (the Lynx) in which the sheath is molded differently for righties and lefties. If you choose a right sheath, what you get is a sheath that would be worn on the right hip and be handled with the right hand. The spine of the blade faces forward so when you grab it, it’s in its natural position in your hand. Likewise, a left sheath is worn on the left side and drawn with the left hand. The knife’s spin faces forward, same as for the right.
Orders
Time to get your order depends on 3 main factors:
- stock level of an item: our web store shows the approximate stock level of an item as well as whether the item is available via backorder. So if we have 3 of something in stock and you want 4, you would still be able to place your order. In such cases we will usually be able to build the model we are short on within 2 or 3 business days and will contact you promptly to provide an ETA.
- the delay between order placement and shipping it: we ship orders mondays, wednesdays, and fridays (and sometimes more often depending on our production and other activities) so that orders go out within 2 business days from the time you place your order. We will contact you promptly in the unlikely event we can’t meet this commitment.
- travel time of the shipment: for most destination, we ship via Canada Post using tracked services so you can watch the progress of your shipment. Worst case shipment times within North America are typically a week. If you choose a priority or express shipping option, service will be quicker. We now offer DHL Express service to USA destinations at the same rate as postal shipments. For most metropolitan locations, your package arrives the next business day after we ship.
Yes we can do custom engraving, with some limitations:
- we engrave only our own products
- we charge extra for engraving.
- we deep engrave with a fiber laser, on the blade only (not handle). The idea is that the engraving is a few thousandths of an inch deep so that it will not wear off. We engrave the right face of the blade opposite our logo.
- The maximum amount of engraving is a few words. Logos and other symbols are also possible depending on complexity. If you have something complex in mind, please contact us before you order and we’ll advise if we can do your engraving on the model you are thinking of purchasing.
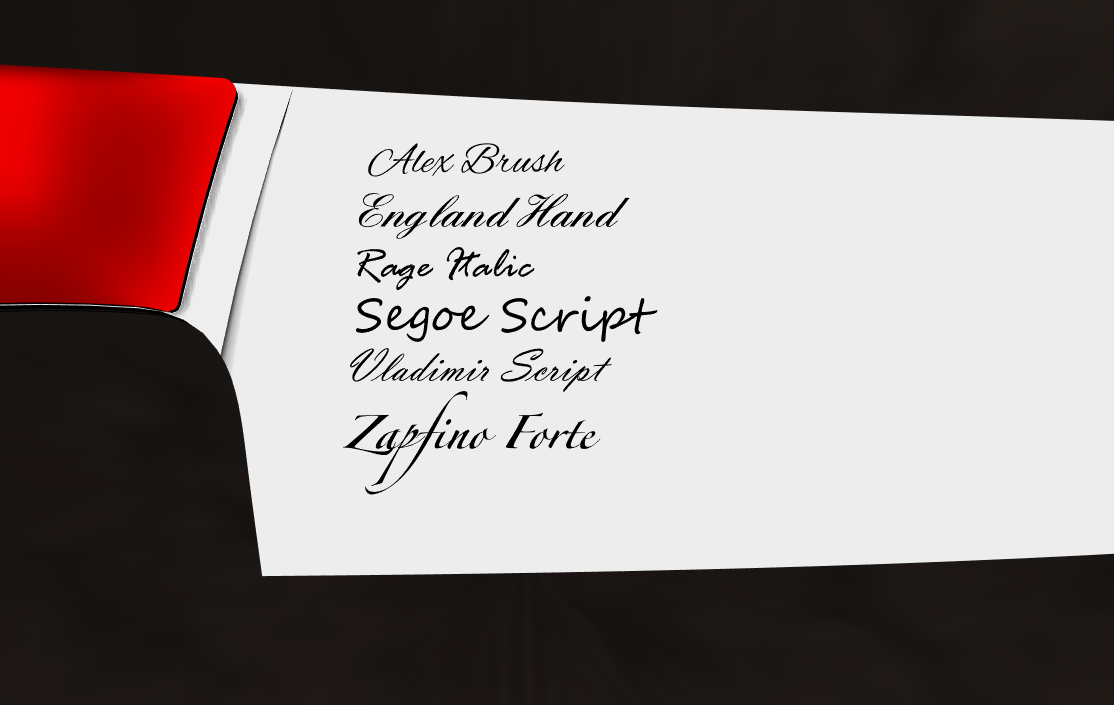
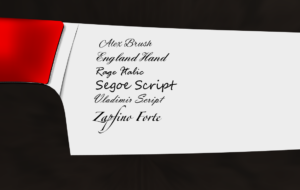
- We can engrave most standard Windows and true type fonts. Examples in the photo below (click to enlarge). If you want to engrave your own artwork or font, we can probably do it but you would have to contact us with specifics. We will let you know if the complexity warrants additional charges.
- To place a web order with engraving, put your knife in the cart and be sure to add the engraving fee to your order. On the checkout page in the order notes field, provide details of what you want engraved. If you have a file containing your artwork, we’ll get you to email it to us once you place the order. We will send you a proof CAD drawing of the engraving on the blade and get your final approval. Then we’ll go ahead with the work. It depends on what you’ve ordered and on our workflow, but we can usually turn your order around within a few business days.
We accept credit card payments via our payment gateway, square.com. Alternatively, you can pay using PayPal. Your card details go to Square or PayPal and are never stored on any servers we control.
On our product pages, if we don’t have stock on an item, you will see that it is “available on backorder.” Usually this just means that we don’t have that item built up and ready to ship immediately. In such cases we can usually make the item up in a day or two.
Occasionally we are waiting on materials to make a regularly stocked item and that may translate into a longer delay. We generally will post a notice on the product page warning about such situations, but if you have made your order and we expect even a few days delay before shipping, we will advise you promptly, giving you the option to modify or cancel your order as you see fit.
We ship exclusively using tracked services, mostly via Canada Post . So there will always be a tracking number for you to use to see where your order is. When we create your shipping label you will receive an email with the tracking number.
Occasionally, some system along the way will lose a shipping email. If you get an order complete email from us, that generally means we have created the label and are about to ship, which means you should have also received a tracking number email. If you did not receive a tracking number, just let us know and we will make sure you get one.
For USA customers, when a Canada Post package crosses the border into the US, USPS takes over tracking, so you can enter the same tracking number into the USPS tracking system to get details of its progress towards you.
When a credit card is used for online purchases, some security checks take place to protect both the seller and the card owner. Payment errors usually result in some sort of helpful message on the checkout page telling you what’s wrong. But they can be confusing.
Obviously, the card number, expiry date and the CVV code on the back of the card must all correlate for any payment to succeed. However, a lot of people are not aware that a postal code and sometimes a street address check are made.
When the payment processor looks up the details associated with your credit card, it will compare address data it has on file with what you entered in the billing address (not shipping address!) on our North Arm checkout page. If the postal code of the two do not match, the payment will fail. The idea is that if someone tried to use your stolen or lost card for an online purchase, they are not likely to succeed because they’d have to know your address and postal code. Occasionally when people enter orders on our system they fill in the billing address field with where they want the package to go. Instead you should always fill in the billing address to match the credit card you are using and then fill in the shipping address with where the item should be sent.
Knife Maintenance
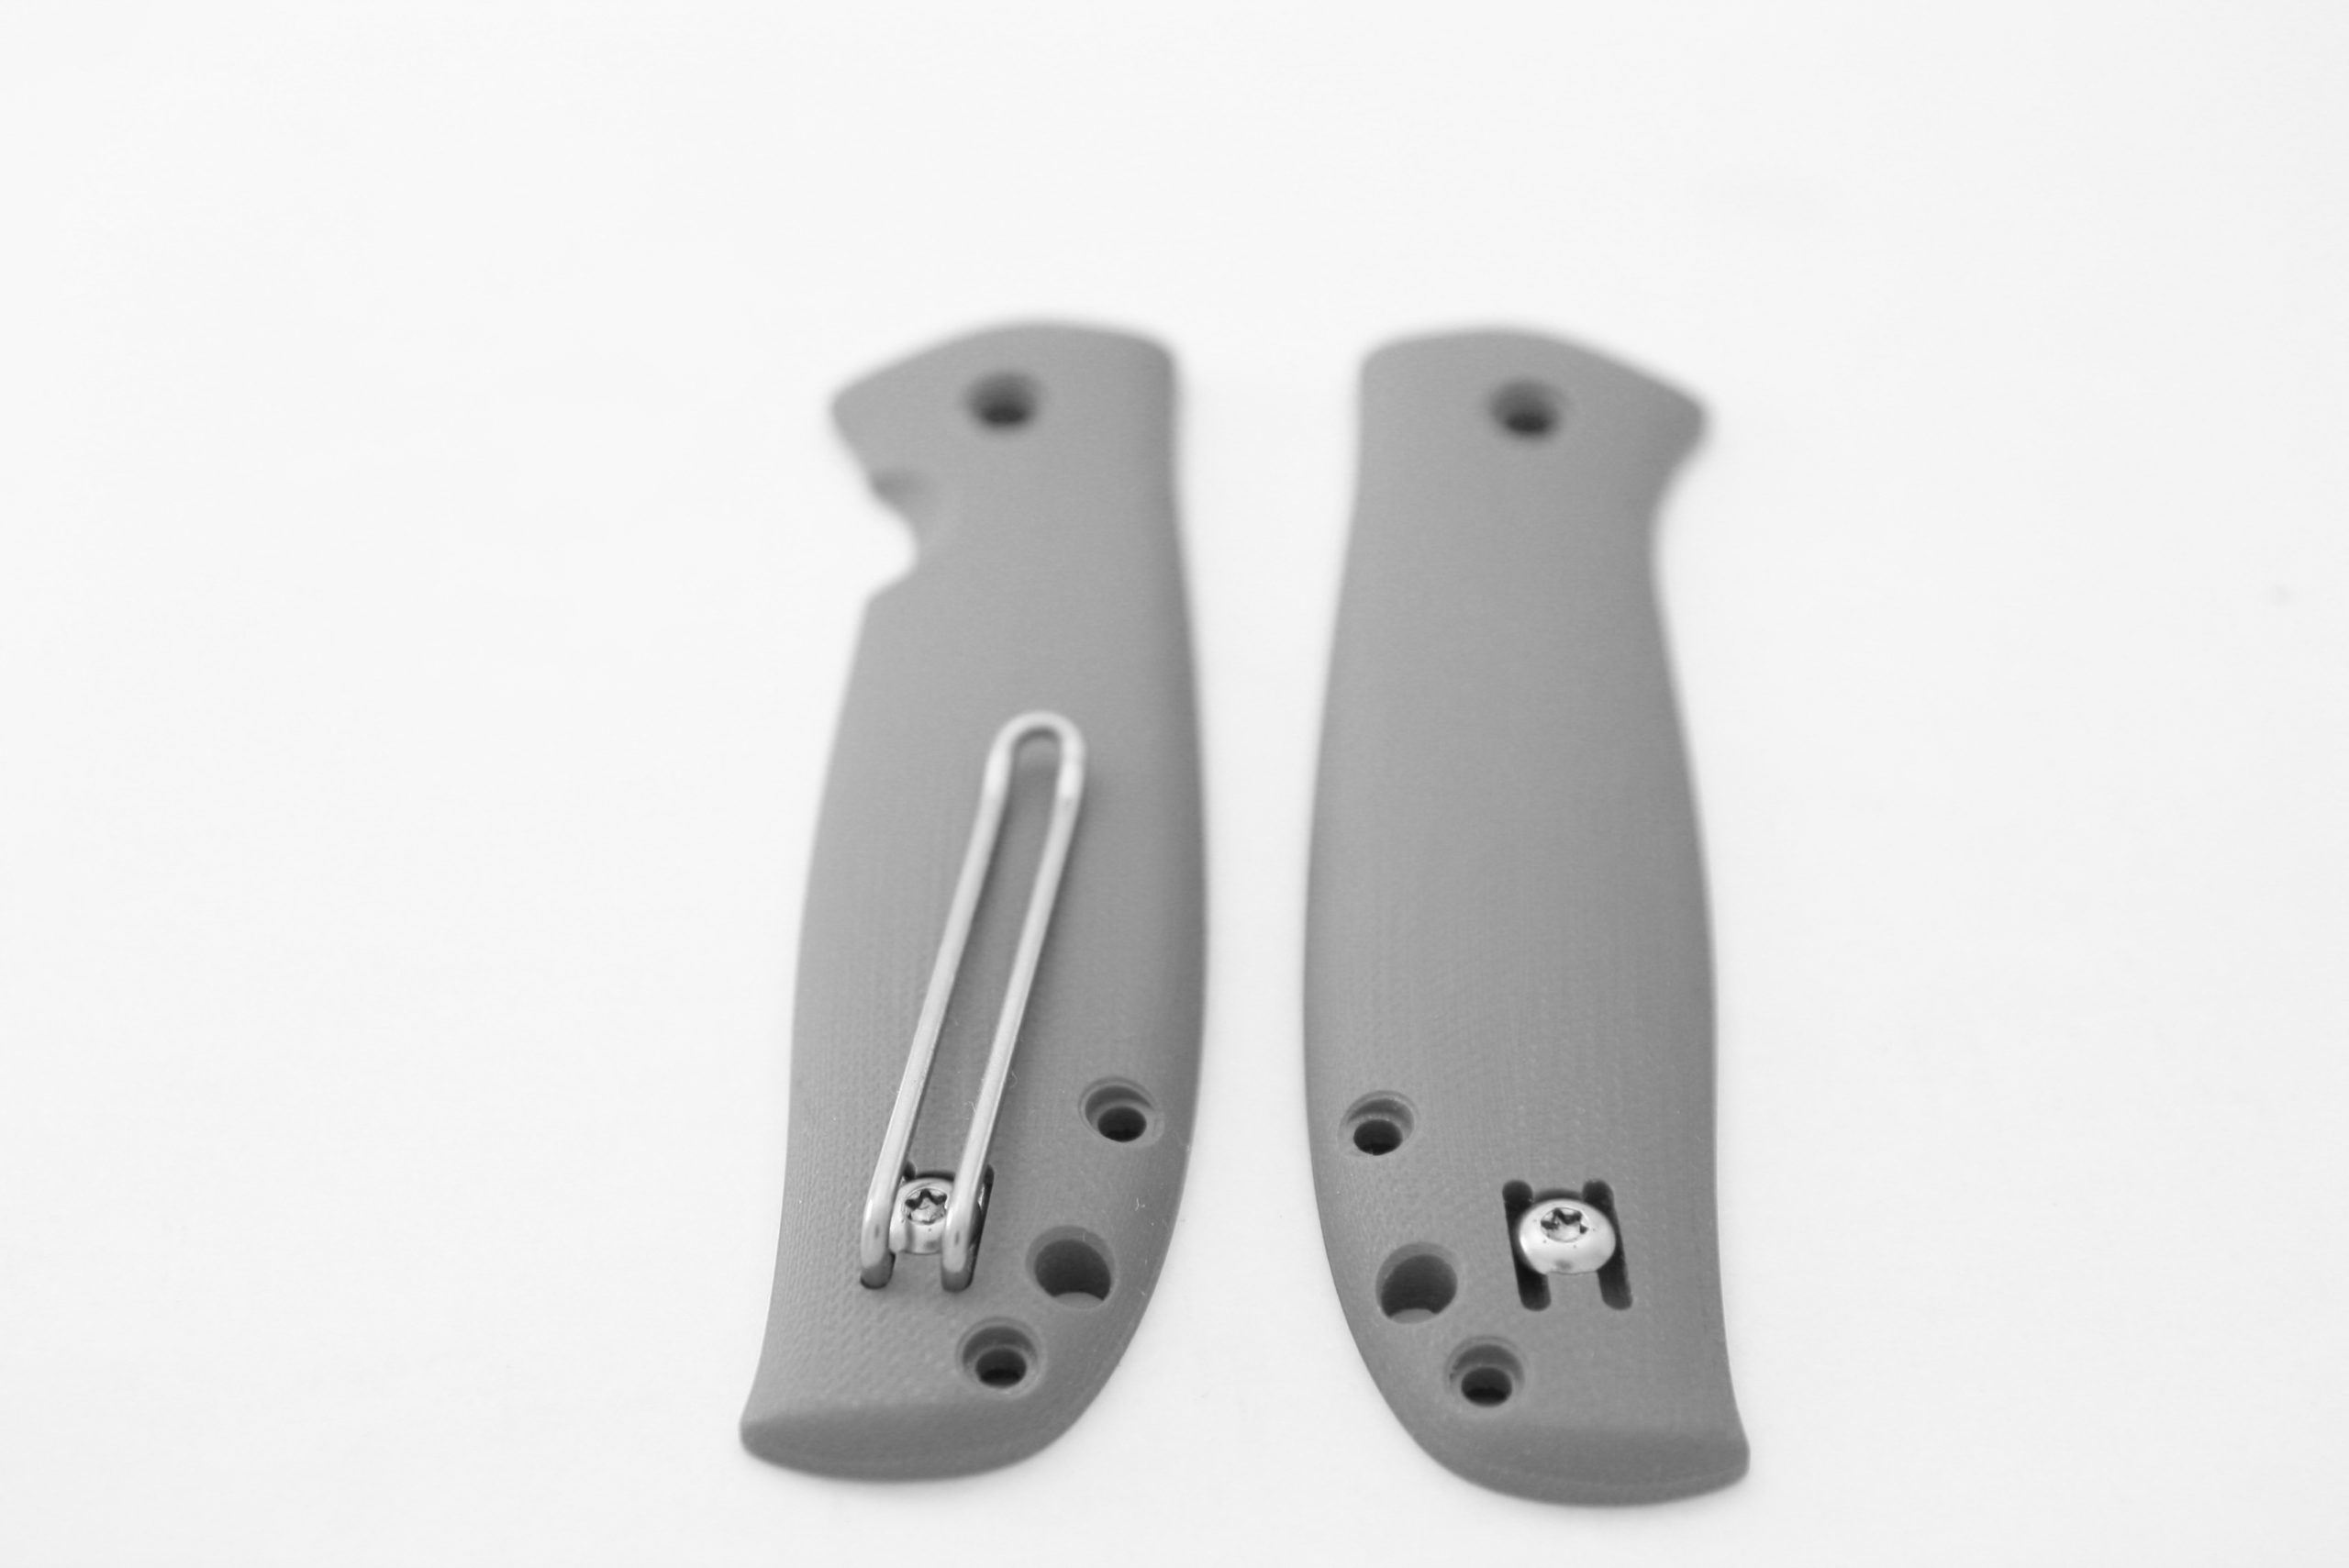
With the left side option on the Skaha, there’s a screw on both sides. The one on the right side normally holds both the clip and the lockbar. The clip mount point on the other side has a backing nut that the clip screw threads into. The lockbar side screw must always be installed during operation, whether it is holding a clip or not and whether it is a regular Skaha or one with dual clip mounts (for left side carry)
To switch the clip between sides:
- open the skaha to the locked position and be careful to stay away from the sharp edge while working on things
- slide in a wad of paper (like a pad of post-it notes) from the bottom edge of the handle so that neither the lockbar nor the backing nut can fall out.
- remove the clip screw where the clip is and screw the screw back in without the clip. Tighten firmly (This is a T10 torx drive)
- remove the screw on the other side and hook the clip under the head of the screw and tighten down snugly
- the knife will now have the clip on the opposite side as before and both clip screws will be in place
- remove the paper wad and test action
We do not ship the Skaha with loctite on the two pivot screws (or any of the screws). In general, this is because the Skaha pivot area is subject to initial bearing to blade wear-in, which may call for some adjustments during this period.
In addition, knives that are fidgeted with a lot, used hard or otherwise accumulate wear over time are eventually going to need the pivot adjusted to maintain the ideal preload on the bearings. Those adjustments are harder to do if the threads have thread-lock on them.
The Skaha was designed to be maintainable which also means that it needs to be maintained. Usually, this amounts to a quick periodic inspection for side to side blade play. And if the knife feels gritty or looks like it may have pocket lint on the internals a soapy water bath, drying and oiling will do it good.
Our guiding philosophy is to only use thread locker if the situation demands it. You may have a particular knife that tends to loosen, perhaps because of vibration, grit binding between the scale and the pivot screw head, being subject to wide temperature swings, or any number of other hard to foresee circumstances. If this is your case, then a medium thread-locker is probably your answer. If you rarely find side to side blade play when you do you check, just re-tighten as needed and don’t bother with the loctite.
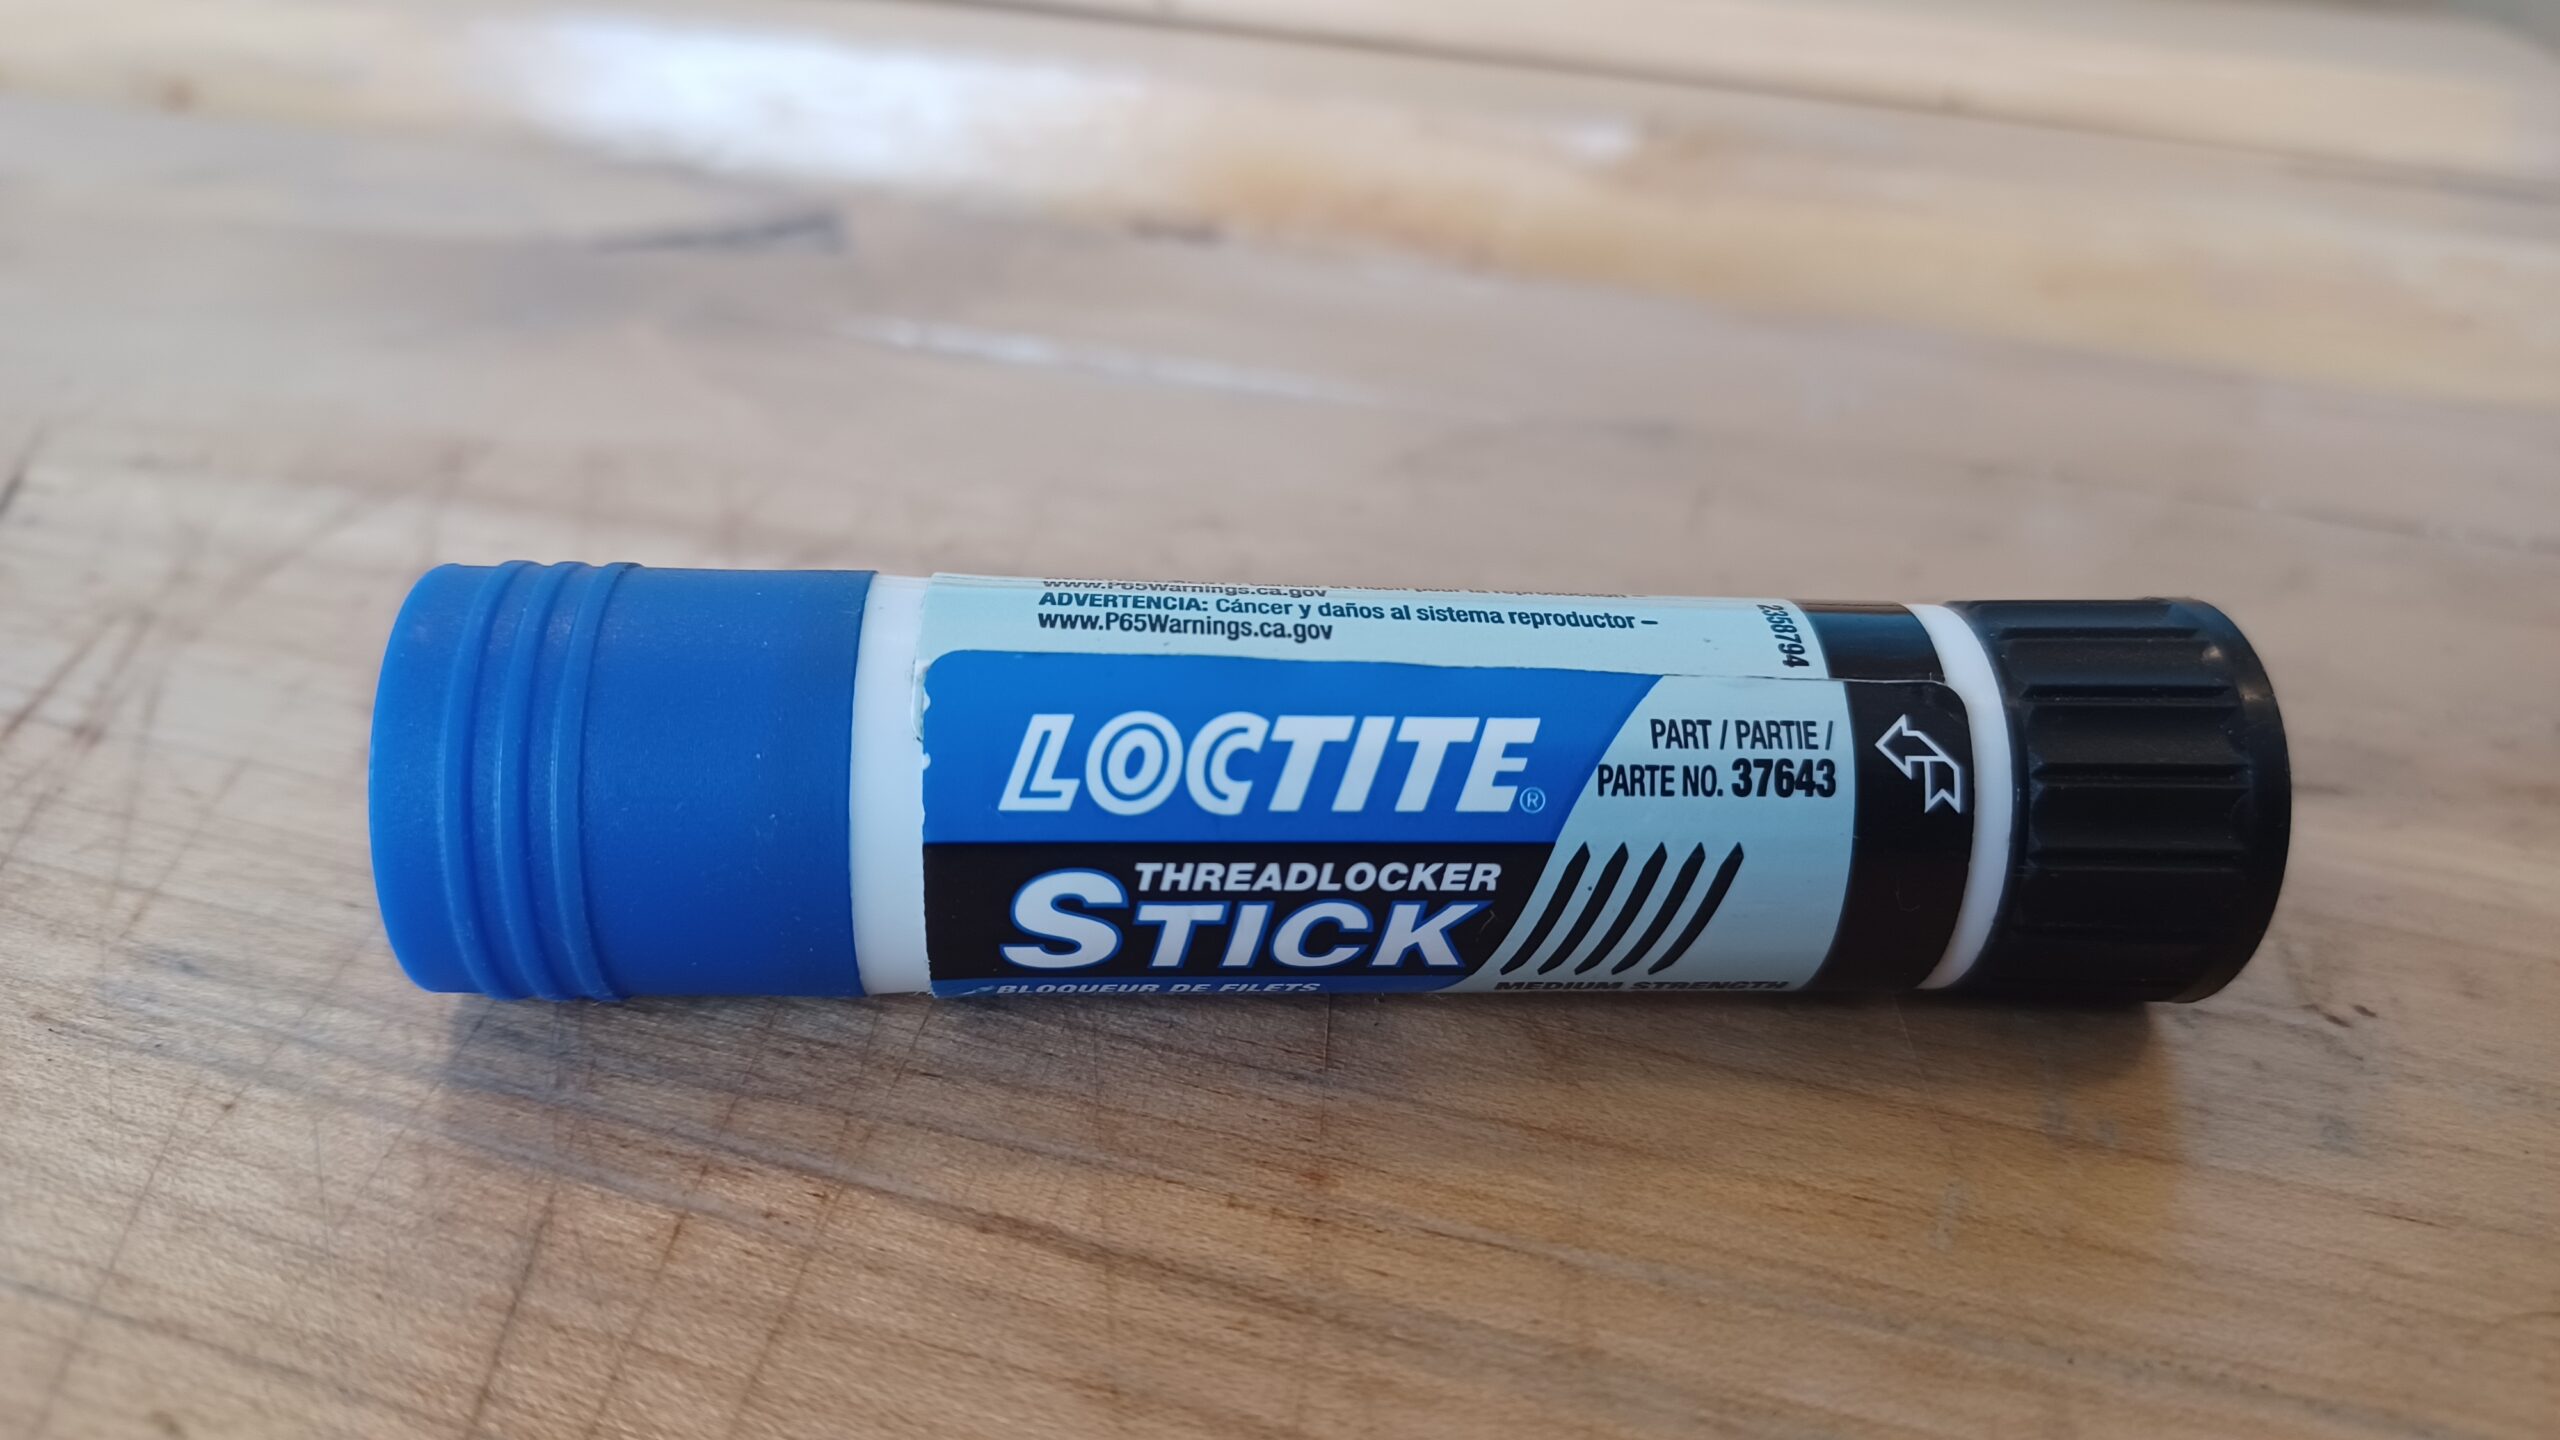
If frequent pivot loosening is happening, we suggest you apply a tiny bit of medium strength loctite blue paste to each pivot screw thread, tighten the pivot screws evenly (T10 Torx) just to the point that side to side play goes away and maybe 1/32 or 1/16th of a turn more. Check the action. If action is sluggish, back off one of the screws till there’s barely noticeable play again and readjust slightly less tight. Too tight leads to unnecessary wear and sluggish action. You want the blade to swing freely but not have play. Let the loctite cure overnight.
When checking pivot screws and blade play, take an extra minute to check the 4 standoff screws (T8) and clip mount screw(s) (T10) for tightness. They are much less likely to come loose, but if you find yourself tightening them fairly often, then they should also have some thread-locker. The loctite we suggest is part number 37643.
These instructions guide you through how to remove and replace handles on our fixed blade knives. Most people will never have to or want to remove their handles, but you might if you are extremely curious or you want to change handle scales for some reason.
Before you start
The scales on older models are attached with 4-40 screws with hex socket heads. You will need two 1/16 inch allen keys to loosen and tighten the screws. Our Lynx and newer models use 6-32 screws with T15 or T10 (Torx drive) heads; usually a single driver is all you need. You will also need a thin yet strong knife or putty knife to aid in separating scales from the tang.
Prepare a clean work space, like a table or bench top, so that if you drop any of the small parts, they don’t get away. Lots of light helps too. It is a good idea to tape the edge of the blade so that you don’t cut yourself. A cutting board can be used as the actual work surface to avoid possibly marring a nice table top.
Removing the old handle scales
- Lay the spine of the knife on the work surface and insert one of the hex keys on either side of one of the sets of screws (eg the front pair). Ensure the tools seat all the way into the screw heads and are nice and square to the head before applying turning force. The screw steel is not as hard as the tools and can be stripped out quite easily if the hex keys aren’t all the way into the sockets.
- Turn one of the tools counter-clockwise while holding the other side from turning. The screw should break free and one side or the other will unthread from the inner pin. Repeat for the other pair (or pairs, depending on the model) of screws.
- Try to thread out all the remaining screws. If the inner pin turns instead of the screw, it may be possible to push the pin and remaining screw out together with either a 4mm or 5/32″ rod, drill bit or a small torx or other screwdriver. Most likely the pins will be quite tight and not easy to push out (accumulated grime).
- In that case, if you can get the screws out of one side of the knife, that scale can be teased off the pins. With all the screws removed from one scale, gently insert a thin putty knife or other thin blade between the tang and the scale near the front of the handle. Try to avoid damaging the old scale in case you want to use it again in the future. With the blade under the scale, slide it toward the back end of the handle to create a gap. Keep moving to where the gap between scale and tang is the smallest (typically from one end to another) and gradually pry the scale off. Remove the second scale using the same technique.
- TIP: screws can be very useful push tools when removing stubborn pins from tangs or scales: just insert an already removed screw a turn or so into the end of the pin you wish to push on.
Preparation before installing new handle scales
- Clean the tang of the knife of any accumulated grime. A wash cloth or perhaps a scrub pad should get most of it.
- Get your screws and pins ready. If the old hardware is in good shape, try to reuse it (particularly the pins because you should not have issues getting them to fit in the tang). Test the fit of the pins in the tang holes. If they do not press in with finger pressure when squarely pushed into the tang, use some very fine sandpaper or a sharpening stone (220 grit or so) to remove any burrs from the end corners of the pins. If pins don’t push in, it’s usually because they are hanging up on the edge of the tang hole.
- If you installing wood scales, it can help to have some paste wax handy to apply to the joints between the tang and scales as an extra measure of protection to minimize water incursion under the scales.
Attaching the scales
- Start by pushing the pins into the front and rear holes of one scale (ie don’t put the middle pin in yet for models with 3 pairs of screws). The pins to use by model are:
- Trillium and Mallard: pins 5/16″ long
- All other models: pins 3/8″ long
- Leave the pin sticking out far enough so that it will extend through both the tang and into the mating scale. Check that the pins are reasonably square to the scale.
- Drop the tang onto the scale with the pins and guide it onto the pins. Ensure that the pins still stick through the tang, ready to snap the other side scale on
- Drop the second scale into place and press it over the pins. This should leave you with a sandwich of 2 scales and the tang, all fitting snugly together with no significant gaps. If your model has a middle hole, push the pin for it into the hole. If the pin hangs up on the tang, hold the sandwich together and push down on the protruding pin (push down on your cutting board) to push it into the assembly
- Start the appropriate screws into all the holes on both sides but do not thread in more and 1 or two turns. The screw lengths to use are different per model:
- Trillium and Mallard: all screws 1/4″ long
- Sitka and Alder: front screws 5/16″, others 3/8″ long
- Kermode 6 and 9″: front screws 1/4″, mid screws: one 5/16″ and one 3/8″, rear screws 3/8″
- Lynx: front screws 1/4″, mid and rear screws 5/16″
- With the screws all started, you now want to adjust them so they protrude approximately equally from each side (ie that the inner pin is centred). Push the screw heads against the work surface as needed to center each hardware set.
- Use the two tools in opposing screws and tighten equally until the screw heads make snug contact with the scales. A gentle snugness is all you need. Be careful not to over tighten or you may either pull the screw through a wood scale (or split it) or risk stripping the screw head.
Finishing up
Inspect your work. Make sure there are no significant gaps between handle and scales that would indicate something got trapped underneath. On wood handles, we recommend applying some paste wax at the joint between scale and tang along the perimeter of both scales to seal water out as much as possible.
There may be times when you need to or want to disassemble your knife and you’d like to know the screw sizes involved. For our Skaha folder, because of its moving parts and internal bearings, disassembly for service is more likely than for our fixed blade models. We do have an article on typical fixed blade handle removal and replacement.
So, in case you need to take things apart, here are the component and driver sizes by model:
- Skaha Folder: pivot screws have Torx T10 heads. thread size is 6-64 (a non-standard thread pitch for fine adjustability), pivot diameter is 3/16″.. Standoffs are 3/16″ diameter, 4-40 thread, Screw heads are T8. Pocket clip screws are 2-56 thread with T8 heads for Skaha 1, and a single 6-32 screw with T10 head on the Skaha 2.
- Older Alder, Sitka: 3/16″ diameter standoffs, 3/8″ long with 4-40 threads. Front screws are 5/16″ length flathead with 1/16″ hex socket drive. Mid and rear screws are 3/8″ long.
- Current Alder, Sitka: 1/4″ diameter standoffs, 3/8″ long with 6-32 threads. Sitka front screws are 5/16″ long while all others are 3/8″ long with T15 or T10 torx drive.
- Old Kermode 6 and 9″: 3/16″ diameter standoffs, 3/8″ long with 4-40 threads. Front screws are 1/4″ length flathead with 1/16″ hex socket drive. Mid screws are one each of 5/16″ and 3/8″ length and rear screws are 3/8″ long.
- Current Kermode 6 and 9″: 1/4″” diameter standoffs, 3/8″ long with 6-32 threads. Front screws are 1/4″ length flathead; mid screws are one each of 5/16″ and 3/8″ length and rear screws are 3/8″ long. All heads are torx T15 or T10 drive.
- Older Trillium and Mallard: 3/16″ diameter standoffs, 5/16″ long with 4-40 threads. All screws are 1/4″ length flathead with 1/16″ hex socket drive.
- Current Trillium and Mallard: 1/4″ diameter standoffs, 5/16″ long with 6-32 threads. All screws are 1/4″ length flathead with T15 or T10 torx drive.
- Lynx: 1/4″ diameter standoffs, 3/8″ long with 6-32 threads. Front screws are 1/4″ length flathead with T15 or T10 drive. Mid and rear screws are 5/16″ long.
If you need any small hardware or have further questions about it, please contact us.
Keeping your Skaha folder running smoothly and cutting superbly is not difficult. Like any other knife, your Skaha works best when you keep it sharp. And because it has moving parts, cleaning, adjustment and lubrication is something you can expect to do occasionally.
Sharpening
The steel we use holds an edge exceptionally well, but does need maintenance to stay sharp. Many systems will work. We cover a variety of sharpening tools on our sharpening page. Avoid pull through sharpeners that use tungsten carbide blades to peel away metal; they remove too much steel and don’t produce a good finish.
Routine Cleaning
It’s important to be aware that several components in the Skaha are made with martensitic stainless steel (heat treatable types of stainless) Such steels are highly stain resistant, not stain proof. They can corrode in very extreme environments, such as prolonged exposure to salt water or strong acids. As soon as possible after exposure to corrosive environments, wash the knife as described in the next paragraph.
An important part of folding knife maintenance is keeping the moving components clean and lubricated to insure smooth operation. If your Skaha feels gritty or stiff it probably needs a thorough washing and some lubricant. Wash it in warm soapy water. Work the blade back and forth under the water to help get all the dirt out. If possible spray into the pivot area with strong pressure (eg. kitchen sink faucet with spray mode) and move the blade through its travel. Do this until the gritty feeling is gone. Then rinse any remaining soap away and allow to air dry. You may blow the knife out with compressed air to speed drying. Once dry, lubricate the pivot, bearings, and detent ball with a few small drops of light oil. A fine tip oiler like the one we sell on our website is very useful for reaching into this area while the knife is assembled. Washing for long enough will remove almost any dirt but if this procedure doesn’t cure the grittiness of your knife, you may partially disassemble it to clean and lubricate See below.
Skaha screw and driver sizes
- Pivot screw: threads 6-64, T10 Torx
- Spacer screws: threads 4-40, T8 Torx
- Pocket clip screw(s):
- V1: threads 2-56, T8 Torx
- V2: threads 6-32, T10 Torx
Adjusting pivot tightness
For maximum smoothness and to minimize wear on the bearings, the pivot screws must be correctly adjusted. We adjust the pivot before shipping and it should remain properly adjusted for quite awhile. However, eventually wear and other factors cause the pivot screws to require adjustment. The pivot screws should be just tight enough to eliminate lateral (side to side) “blade play”. Any tighter can cause the action to become stiff and will cause unnecessary wear on the bearings. To check for play, gently push and pull sideways on the blade when locked open. You shouldn’t see or feel any obvious slack. If slack is present, tighten either pivot screw very slightly. Repeat until play is gone. If the blade’s travel feels stiff and no lateral play is present, your pivot may be too tight. In that case, loosen until you get play then tighten as described.
Disassembly and Reassembly
To take the Skaha apart for cleaning, follow the steps below. We have also made a video showing the process.
[kad_youtube url=”https://youtu.be/a3xHl8Psfzg” ]
Note: The Skaha pocket clip screw(s) serve the dual role of securing the clip and anchoring the lockbar to the handle scale. We recommend you leave the pocket clip installed during service. If you must remove the pocket clip, don’t remove the lockbar from the scale. There is no reason to do so and any damage caused would not be covered by warranty. Improper removal can cause the lockbar to snap and re-installing it improperly can cause your knife to function incorrectly. If you have a valid reason for removing the LB, contact us for directions on how to do so. Also, repeatedly removing and reinstalling the lockbar could eventually cause slack in the press fit. If you decide to use the knife without a clip, the screw(s) must be reinstalled to make sure the lockbar stays secured in the handle scale. The screw(s) are just short enough that they won’t interfere with the blade but it is a good idea to check the clearance after assembly.
- Before you start. Make sure you are working on a clean surface. Have a small container or dish ready for small loose parts. Don’t work over an area where small parts could go missing easily.
- You’ll need torx screwdrivers with T8 and T10 drives, as well as a 1/4″ or wider flat tip screwdriver that’s covered with two layers of electrical tape ( to prevent marking). Have some paper towels or cloth handy as well as light oil with a fine tip needle applicator.
- Tape the cutting edge of the knife with a a couple of layers of masking or electrical tape before you go further. This protects both you and the edge.
- With the blade closed, loosen and remove the rear spacer screws from the side opposite the pocket clip.
- Then loosen and remove the pivot screw from the same side. With all three screws removed from that side, use the flat tip screwdriver to tease the scale away from the rest of the assembly, you may use a turning motion (as if you were turning the driver to remove a screw), but this can mark up the G10 if you aren’t careful. Be careful not to pry on the edge of the blade. Open it partially if necessary. Be sure to work the scales apart evenly at each end so the scales stay as parallel as possible
- The scale should then come free of the pivot, stop pin and the two spacers.
- As the scale is lifted off, the bearings are exposed. Each side of the blade has a thin washer which goes into the bearing pocket on the scale. The caged bearing is sandwiched between the washer and the blade. Keep track of the part order and orientation of the bearings and washers. The washers have a shinier side which should face the bearing.
- Wipe the pivot pin clean and rinse the bearings with solvent (isopropyl (rubbing) alcohol is good because it evaporates quickly and is not too aggressive), and pat dry with a lint free cloth.
- Wipe off the lockbar (still attached to the scale) and other exposed surfaces of the blade and scales, using the same solvent, as needed.
- To reassemble, make sure the stop pin is in place on the lockbar side scale (it may have pulled out with the scale you removed.
- Assemble the parts in order onto the pivot, oiling each bearing with a couple drops of oil. Also add a drop or two inside the pivot hole in the blade.
- Lower the loose scale evenly into place onto the mating holes where the pivot, stop pin and spacers protrude. Be very careful that these all align and gently coax the scale into place with hand pressure only.
- Check for parallelism of the scales and correct as needed.
- Install the 3 removed screws and fasten lightly.
- Seating the stop pin fully is crucial. Usually this can be achieved by squeezing hard on both handles right above the stop pin. You may also carefully use a clamp or other tool to carefully apply pressure to this area. Steel will scratch G10, keep this in mind if you use a tool.
- Adjust the pivot as described above
- Tighten the spacer screws snugly but avoid over tightening.
- Check blade centering and smoothness of operation. If not quite right, try loosening the screws and repeating the tightening sequence
Services
No.
We make and sell a set line-up of products, each of which is available in several variations, but we do not do custom designs or alteration of our designs. This is primarily because we make knives on CNC equipment that requires extensive fixturing design ahead of time and is thus not cost effective to the end customer for one-off production.
Yes we can do custom engraving, with some limitations:
- we engrave only our own products
- we charge extra for engraving.
- we deep engrave with a fiber laser, on the blade only (not handle). The idea is that the engraving is a few thousandths of an inch deep so that it will not wear off. We engrave the right face of the blade opposite our logo.
- The maximum amount of engraving is a few words. Logos and other symbols are also possible depending on complexity. If you have something complex in mind, please contact us before you order and we’ll advise if we can do your engraving on the model you are thinking of purchasing.
- We can engrave most standard Windows and true type fonts. Examples in the photo below (click to enlarge). If you want to engrave your own artwork or font, we can probably do it but you would have to contact us with specifics. We will let you know if the complexity warrants additional charges.
- To place a web order with engraving, put your knife in the cart and be sure to add the engraving fee to your order. On the checkout page in the order notes field, provide details of what you want engraved. If you have a file containing your artwork, we’ll get you to email it to us once you place the order. We will send you a proof CAD drawing of the engraving on the blade and get your final approval. Then we’ll go ahead with the work. It depends on what you’ve ordered and on our workflow, but we can usually turn your order around within a few business days.
We are not a custom knife maker; we concentrate solely on producing our own lineup. If you have a dream project for a custom knife you’d like see come to life, we are not the ones to do it. We suggest you do an online search for custom knifemakers within your region or as far out as you have to look to find someone with the capabilities and desire to do your project, and then start a dialogue. You’ll find out soon enough if you think you can work with that maker.
Alternatively, if you have the tools and the basic skills, you could consider making your own knife. You can find plenty of information online to guide you.
Shipping
Time to get your order depends on 3 main factors:
- stock level of an item: our web store shows the approximate stock level of an item as well as whether the item is available via backorder. So if we have 3 of something in stock and you want 4, you would still be able to place your order. In such cases we will usually be able to build the model we are short on within 2 or 3 business days and will contact you promptly to provide an ETA.
- the delay between order placement and shipping it: we ship orders mondays, wednesdays, and fridays (and sometimes more often depending on our production and other activities) so that orders go out within 2 business days from the time you place your order. We will contact you promptly in the unlikely event we can’t meet this commitment.
- travel time of the shipment: for most destination, we ship via Canada Post using tracked services so you can watch the progress of your shipment. Worst case shipment times within North America are typically a week. If you choose a priority or express shipping option, service will be quicker. We now offer DHL Express service to USA destinations at the same rate as postal shipments. For most metropolitan locations, your package arrives the next business day after we ship.
Destinations
We can ship to most places but it can get expensive outside of North America. See Costs below. Shipments to Australia and many western European countries that support tracked parcel shipments via national postal systems are fairly straightforward and not outrageously expensive. But even some European destinations are not served by tracked postal systems. In those cases Canada Post uses Fedex and a priority service to do deliveries and tracking and it starts to get outrageous. At that point you have to get creative, as in: do you have a friend in North America who is travelling your way soon?
Customers outside of the USA and Canada should verify before they place an order that the type of knife they are purchasing can be imported to the country where they live. In general, the kitchen and fixed blade knives we sell should not be a problem, but some countries may have rules about maximum blade lengths, or other restrictions, so if you are in doubt, please check the applicable laws in your jurisdiction.
Costs
We ship from metro Vancouver British Columbia. Generally the farther away you are the more it costs. We ship primarily via Canada Post. Our checkout page does a look-up at Canada Post for exact shipping charges to your address, so you will see immediately the total cost to ship. Already in the cart, you can check shipping costs for items in the cart by supplying a country and postal code.
If the Canada Post website isn’t reachable when you place your order, you will still see a flat rate shipping option for USA and Canada destinations. In such cases we will only charge you what it costs us to ship (usually less than this) and refund the difference to your credit card if it is more than $1.
Within metro Vancouver shipping is usually about $11; other BC locations about $12-15 and other parts of Canada and the USA it’s normally $15-23. To much of western Europe and Australia, shipping costs in the $25-60 CAD range for a single knife and maybe $100 for 5 knives, so it gets less per knife in numbers. For countries not served by tracked postal services, costs can range up to $170 or more for a single knife, so not practical, unfortunately. If you have other questions please email us.
Order Tracking
We only offer trackable type shipping methods. This means that you will get an email with your tracking number and be able to follow its progress to your address.
We ship exclusively using tracked services, mostly via Canada Post . So there will always be a tracking number for you to use to see where your order is. When we create your shipping label you will receive an email with the tracking number.
Occasionally, some system along the way will lose a shipping email. If you get an order complete email from us, that generally means we have created the label and are about to ship, which means you should have also received a tracking number email. If you did not receive a tracking number, just let us know and we will make sure you get one.
For USA customers, when a Canada Post package crosses the border into the US, USPS takes over tracking, so you can enter the same tracking number into the USPS tracking system to get details of its progress towards you.
Warranty
Satisfaction Guarantee
We want you to be a happy North Arm customer. We offer a 30 day satisfaction guarantee, meaning that if the product does not meet your expectations during that time, for any reason, just ship it back to us (you are responsible for shipping/insurance costs) in it’s original condition and we will refund the original purchase price minus the original shipping charges.
Our satisfaction guarantee excludes:
- engraved knives (we provide a proof for your approval before we do any engraving)
Lifetime Warranty
We stand behind the quality of our products by offering a lifetime warranty against defects in materials or workmanship. This warranty applies to the original purchaser. If you bought one of our products in the secondary market, restrictions to the warranty will apply.
Our warranty excludes:
- normal wear and tear
- damage from inappropriate use or care
If you run into troubles, please contact us. Once we understand the circumstances of your issue we will decide how to best rectify the problem.
Knife Care
We finish the wood handle scales with a highly water resistant coating which will help to preserve the wood’s natural beauty for years to come. To maximize the life of the finish, follow these care instructions.
- Avoid prolonged submersion in water
- Hand wash and dry; steering clear of scrub pads and abrasive cleaners that would mar the finish. Do not put in the dishwasher!
- Prevent scratching and chipping of the finish by storing in a knife block or equivalent
- Avoid exposure to high heat and staining substances